Tag Archives: pattern review

Sewing Vintage Patterns: 1960

image

I have a handful of sewing patterns from my Grandma’s stash. I pulled them out the other day for inspiration and noticed that the sizing on some of them looked as though it might fit me. Jackpot! I decided it was time for me to begin sewing vintage patterns.

Sewing Vintage Patterns

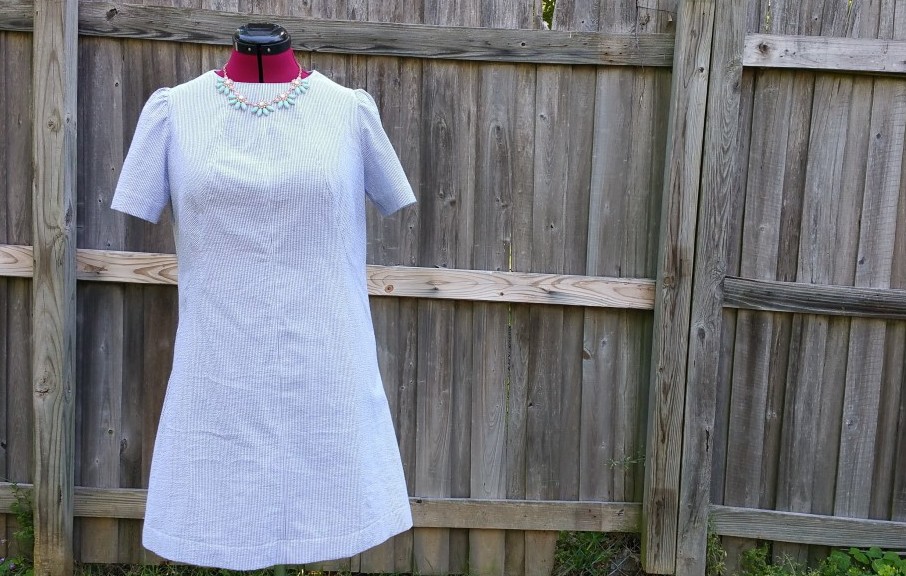
I love seersucker. I’ve sewn up seersucker for many, many babies, but I’ve never sewn up seersucker for myself. It was about time. I decided that the shift in McCalls 9268 would be the perfect match to my navy mini-stripe seersucker.

image

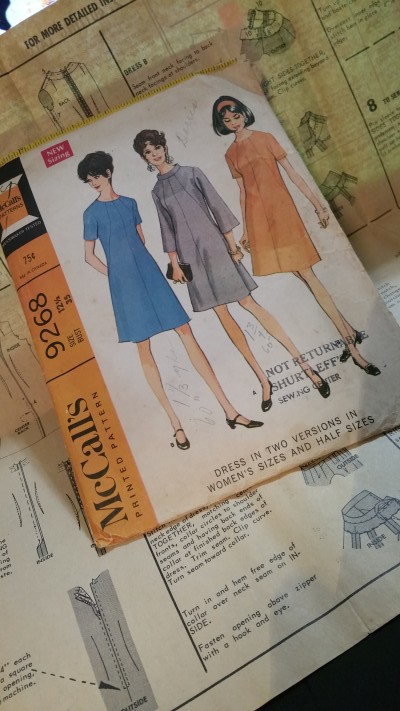
Review of McCall’s 9268, copyright 1968 

From the pattern envelope: A-line dress, lightly shaped by center and side front seaming and vertical back darts, has center back zipper. Dress may have short or three quarter length set-in sleeves, and may be underlined. Short sleeved dress has faced and interfaced neck, side front seams may be stitch trimmed. Dress with faced bell sleeves has bias band collar included in neck facing seam. Collar and neck are interfaced.

I’m certain my copy of this pattern is my grandmother’s as it has her name written on the front along with notes about how much 60″ fabric she’d need to stitch it up. The tissue has been cut out and a pattern layout for view A is circled. I decided to make an underlined version of view B.

Pattern Sizing 

One difference in vintage patterns and today’s patterns is the sizing. Most patterns today are multi-sized patterns, because frankly, most of us don’t fall into one size. This pattern is a single size-12 1/2.  It is considered a “half size”.  Here’s how the sizing chart compares:

  • Pattern from 1945, size 12:          Bust-30, waist-25, hip-33.
  • Pattern from 2016, size 12:          Bust-34, waist-26.5, hip-36
  • Pattern from 1968, size 12 1/2: Bust 35, waist-28, hip-37

Those measures are very close to mine, so I didn’t make any changes to the sizing before I stitched it up. Next time, I’ll decrease the bust by about 1/2 an inch. After putting the dress on, I did taper the side seams about 1/2 an inch at the waist.

Don’t let a single size pattern scare you off. If your largest measure matches, you can tweak the rest of the pattern to fit you. For this dress, I knew my hips would fit and with all the other seams, adjusting for the chest and waist was no problem.


Details, Details, Details

image

Details are key in vintage patterns. A great feature of this pattern is the shoulder dart. The dress has interesting front seams that wrap to the sides. These are similar to princess seams and make the dress easy to alter.

image

The pattern instructions have topstitching on either side of every seam. This step is a must as it is a detail that just makes the dress. I top-stitched the center front, the front side seams, and the side seams.

Finishing seams

image

I finished my seams the way my grandmother always did. I finished the neck facing with a zig-zag stitch. Then I used my pinking shears on the my seam allowances.

Underlining

image

My grandmother tried to teach me that the inside of my garment should be as neat as the outside.

One other note:  I was slightly afraid of lining the dress completely.  This pattern has you baste the underlining and the main fabric of each piece together and then stitching your dress up, treating both pieces as one.  Piece of cake.

image

So what did we learn about sewing vintage patterns?

  • Don’t be scared off by single size patterns.
  • Vintage patterns have great details.
  • Put up your serger and finish your garment the old fashioned way.
  • Make the inside of your garment as pretty as the outside.
  • Underlining is easy. And necessary.

Tell me?  How many of your mom’s, grandmas’s, or other vintage patterns do you have?  Have you tried one yet?  What’s stopping you?

Pocketful of Posies Dress

I love a great dress.  Something easy to wear, something comfortable, something easy to move in, something with pockets!  When I first saw the Pocketful of Posies Dress on Indiesew, I knew I wanted to stitch it up.

I had a little trouble finding a fabric I liked, but when I did, this was the result:

IMG_0314

Oh my goodness!  How fun!  This dress is so much fun to wear.  The pockets are perfection.

Just a few notes about it’s construction:

  • The pattern pieces taped together easily.  I cut a medium.  I probably could have gone a size smaller, but I wasn’t sure.  Except in the arms.  The sleeves are just about right.  Any smaller and I think they’d be too small.
  • The instructions are easy to follow.  I used my serger for most of the construction, but a beginner could do just as well with a stretch stitch on the sewing machine.
  • I cut off about 4 inches in length.  I’m short.  I should have added a little length to the bottom band so I wouldn’t have gathers, but I was out of fabric.  I used every single square inch I had.
  • The neck line is low.  Next time, I’ll raise it about 2 inches.  To do that, I’ll have to modify the front, the pockets, and the side panels.
  • The thick neck band didn’t work for me, so I removed mine and made it half the width.

The Cabin Tunic

I recently stitched up another fun pattern.  Meet the Cabin Tunic.

image

I purchased this pattern after seeing it featured in Indiesew’s Fall 2015 Collection.  I almost didn’t, but then I stumbled on a darling black and white polka dot cotton lawn on a discount table at Hancock’s Fabrics.

This cute tunic is loose and flowy.  The pattern was well written and easy to follow.  I decided to cut a smaller size to fit my shoulders and then just do an FBA.  The pattern has great instructions for FBAs.

image

Pockets!  It has pockets!  Hooray!  They were simple to make, again thanks to great instructions.  I didn’t make any other pattern adjustments, but if I make it again, I may shorten it.  Or I might lengthen it to wear as a dress…

I would recommend this pattern for an advanced beginner.  It makes a cool and comfy top.  I do think fabric choice can make this top fabulous or icky.  Make sure you choose a lightweight fabric that drapes well, unless you are going for a boxier look.

The Ella Top

The short and sweet:  Love this top.  Fit me beautifully.  Pattern is very well written.  No craziness when taping the pdf together.  If you are scared of sewing with silky fabrics, this would be a great pattern to practice with.  Just press and pin lots!  Now for all the details, read on…

20150819_093320

When I find a pattern I love, I tweak it and modify it and use it over and over and over and over again.  The Ella Top by Liola Patterns has been that pattern for me this August.  I LOVE this top.  I picked up the pattern as part of Indiesew’s Summer 2015 pattern collection.

I stitched it up straight off the pdf in a small with one exception.  I debated a medium or at least a full bust adjustment, but decided to run with it.  After seeing others’ versions, I did decide to raise the neck line about one inch.  Here’s the tutorial I followed.  It’s stitched up in a 100% cotton woven.  I’m not sure where I found the cute elephant fabric but I love it. It’s a quilting/crafting weight fabric.  The fit is almost spot on for me.

20150819_093342

I decided to make a corded piping in a contrast fabric for the back trim.  Love it.  (Please excuse the wrinkles.  I’ve worn the snot out of this top since I made it!)

20150819_093650

Since I liked it so much, I decided to do it again.  This time in a polyester silky leopard print that I picked up at Hobby Lobby some time ago.  I’m not a leopard print kinda gal, but I’m planning on this being a layering tank.

  20150819_093817

To modify it this time, I stitched the neck and arm bindings out instead of down.  I love it.  Also, after wearing the elephant tank a few times, I decided that the back yoke was just tight enough to be uncomfortable sometimes.  So, I just cut my back yoke on the bias.  Boom.  Extra give.  Woo hoo.  The final change I made on this piece was an easy one.  Instead of the back pleat, I just gathered those few inches.

 20150819_093710

And then I went off and did it again. 

20150819_094006

This is my favorite!  This is a piece from Hancock’s Fabrics’ special occasion line.  I’m sure it’s a poly blend but I bought it so long ago, I couldn’t tell you more than that. 

The modifications:  1.  back yoke is cut on the bias and 2.  added 11 inches to the length.  That’s it.  I love a good pattern hack!

Seersucker for Easter

IMG_5721

I tried 2 new patterns this Easter  Both the tie pattern and the dress pattern were very well written and had step-by-step pictures that would make it simple for even a beginner sewing enthusiast to follow along.


484232_10151381837895963_1661315595_n

The tie pattern from Butterfly Tree was very simple, however, I thought their pattern instructions were not the most efficient.  I made a second one just with common sense and found it much quicker.  The only change I made to this pattern was to monogram it before stitching together.  Christopher got so many compliments on it.  I’ve been asked if I’ll carry ties in my shop.  I probably will, but not this pattern.  I personally found the tie slightly too narrow for my taste and I didn’t care for the construction instructions.


IMG_5744The dress is Emmaline from Violette Threads.  This is a maxi dress with a ruffled, v-neck and ruffle variations along the bottom of the dress.  My big girl choose the red stripe seersucker from the shop stash.  This pattern only runs up to a 10, but it was very simple to grade it up one more size.  Addie chose the single ruffle design, thought the triple ruffle along the bottom would be really cute too!  This dress was surprisingly quick to stitch up.  The dress only took me about 2 hours!  I can’t wait to try more patterns from Violette Threads.  Addie already has her next dress picked out!


The Lisette Traveler Dress

***Edited May 9, 2014:  Simplicity 2246.  The Lisette Traveler Dress.  This is still one of my most popular pattern reviews.  As of today, the pattern is still available on Simplicity.com.  If you’ve made up this dress, I’d love to see your version!  Post a link in my comments.  Thanks!***
Hooray!  I finally spent some time sewing for myself!
Here’s the whole story:
Waaaaaay back in April, I saw this blog post about some new patterns.
So, in the wonderful way that blog-hopping works, I followed Jenny’s links to this site.
And I fell in love with all the patterns.
All 4 of them.
So I took the occasion of a 99 cent sale to grab them.
All 4 of them.
First up, I tried Simplicity 2209, the Passport Dress.
This little dress is so cute.  I love the dart details on the front.  But, sadly, it didn’t flatter me.  At all.
You will not be seeing pictures of that dress.
Then I tried Simplicity 2246, the Traveler Dress.
We have a winner.
I used a canvas print from the Lisette collection at JoAnns Fabrics.
(Don’t flip out at that word canvas.  It’s actually quite soft and drapey.  You can more info about the fabrics here.)
 101_0130
The pattern changes I made were all inspired by laziness!
  • I didn’t want to match the patterns on the pockets, so I left them off.
  • I didn’t want to match the patterns for the button plackets, so I choose to make them in a contrasting white instead.
  • I cut out the wrong sleeve pattern by mistake.  Rather than cut the right one, I just ran with what I had.  The biggest difference:  the sleeve for view C was designed to be gathered and a sleeve band added.  I didn’t want that, so I just did a little pleat to take out some of the extra instead.
101_0131
Inspired?  Possibly.
Lazy?  Yes.
Do I love it anyway?  Absolutely.My PR review is here.

Next, I think I’ll try Simplicity 2211, The Market Blouse and Skirt.
And then I’ll get to Simplicity 2245, the Portfolio Tunic.
Finally, I’ll try Simplicity 2209 one more time.
Why?  Because I love all 4 of them!

I’m linked up here: