Category Archives: Being Creative

Fostering creativity through sewing and other hobbies

Book Review: New Complete Guide to Sewing

New Complete Guide to Sewing:
Step-by-step techniques for making clothes and home accessories
Published 2002 by Reader’s Digest
ISBN:0-7621-0420-1

Some Chapter Headings:

  • Sewing equipment and fabrics
  • Neckline finishes and collars
  • Fastenings
  • Tailoring

I liked:

  • The format! It is very easy to open this book to the contents and quickly identify the chapter I need.
  • The great fitting section. There were lots of photos showing how and where to measure for 16 useful measurements.
  • The great diagrams showing fit alternations on pattern tissue.
  • The diagrams showing common “wrinkles” and how to adjust fit for each.
  • 14 pages of hand stitches!

My dislikes:

  • Only one-The extensive list and descriptions of fabric has pictures, but they aren’t complete or labeled.

Conclusion:

I refer to this book at least once a month. It has more information than I could ever list. In fact, it would be easier to list what’s not included than to tell you everything that is! So far, every time I’ve need information, I’ve found it here! I use the fitting chapters more than anything else!

This book has 20 projects throughout that use the techniques covered in each chapter. It also has a quilting chapter, but you should note that it consists of only 2 projects and no additional diagrams or explanations. The book also contains a 4 page glossary.

Would I buy it for myself? It’s the most used book on my shelf!
Would I buy it for a beginner sewer? Absolutely.


****note:  I’m in the Amazon Affiliate Program.  I will be monetarily compensated if you purchase through the link above.    That said, I do truly love this book and my recommendation has nothing to do with this affiliate program.

My Mini-Wardrobe Contest Entry

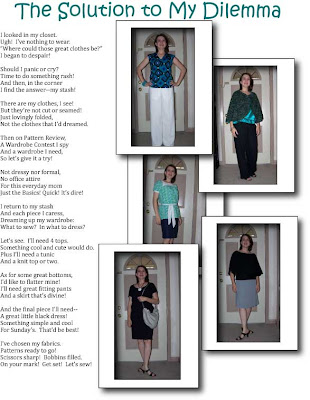
Well, I’ve done it! I’m finished. And just in the nick of time. Top 10 things I learned (or was reminded of that I already knew):

10. Try a new pattern–it’s fun!
9. How to put a pocket in my favorite pants.
8. Ribbon is a creative cover-up.
7. If you are going to sew with a plan, work with the plan
until you find something you like. Don’t settle.
6. How to make a round shoulder adjustment.
5. A great reference is invaluable! Watch for a review this Monday.
4. Altering for the shoulder slope will keep arm holes from gaping.
3. I can make a pair of pants in 63 minutes!!! (with a pocket)
2. Plans can change!
and my huge #1…If you wouldn’t buy it in the store, don’t make it!!!!!

Simplicity 3631 made a great jumper. Here’s what I did:

  1. I made my lining as my muslin.
  2. I altered my pattern pieces.
  3. I made up the lining/muslin bodice according to my newly altered patterns. I also used the skirt pieces and basted the skirt onto my lining/muslin, just to be sure.
  4. I found that my armholes gaped and that the waist was indeed too long.
  5. Folded out an inch of length just above the waist. You can see this in the image to the left.
  6. I made a sloped shoulder adjustment per page 48 in my book.
  7. This fit nicely, so I took the whole thing apart, adjusted my tissue pattern again, and cut my garment.
  8. I put the garment together following the instructions, which I found quite easy to follow.
  9. I ventured from the instructions in step number 13 where it appears they treated the lining and garment as one during the installation process. This gave me very poor results, so I ripped it out and inserted the zipper into the garment only. Then I folded under the lining and tacked it in place. Just FYI, I have been using the lapped zipper technique published in the December 2007/January 2008 Threads magazine with great success. (Upper left image.)
  10. I finished the garment as instructed.
  11. I added bra strap carriers in the same ribbon used throughout my mini-wardrobe pieces.

Simplicity 3631 also had a fun jacket:

For this jacket, I made it straight by the pattern. The only exceptions:

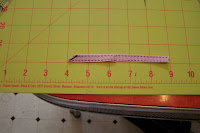
1. I did my darts on the inside. A little less fussy that way.

2. I wasn’t happy with my button holes, so I hid them in ribbon. I took lots of good pictures of this, so look for a tutorial posted during the next week. Here is the ribbon I used. I also used it as an accent throughout my wardrobe.

Here’s another shot of that jacket.

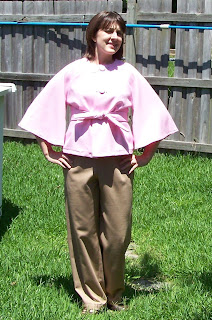
McCalls 5426 Princess Seam Top

You’ll have to excuse my photographic assistant in the bottom of this picture. Rex couldn’t stay out of the way!

This is a McCall’s “Made for You” pattern that includes different pattern pieces for AB/C/D cup sizes. I made view C and I did not have to make a FBA. I did shorten the length as usual. I followed the instructions without problems, but I wouldn’t recommend this pattern to a beginner because it lacks the friendly little reminders to clip curves, press seams etc. I would also note that the construction order is strange to me, but I followed it and it worked out fine. There is a LOT of topstitching in the pattern.

BTW, I used a Kona Cotton. It will wrinkle a little, but when I first washed the piece, it came out of the dryer quite nice, so I’m hoping…

Here’s another image of the shirt under my jumper.

Hot Patterns Sugar Babe Set pants! (These are seen in 2 of the images above.)

You already know I love these pants. I now have 4 pair! My only complaint–they don’t have a pocket! So,
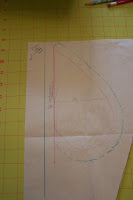
 I added one!

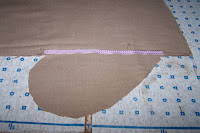
I traced my hand so I would know about how wide I needed it to be.

I drew a slanted tear drop around my hand.

I added 5/8 inch seam allowances around it.

I taped the pocket to my pattern tissue, matching the side seam lines and cut out my pants. (You should note that this took about an extra 1/2 yard and had much wasted fabric.)

I stitched a piece of ribbon along the seam allowances on the front of each pocket for 
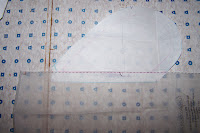
support. (At this point I referred to a handy sewing guide. Look for a review of the Reader’s Digest New Complete Guide to Sewing coming soon.)

I basted the pocket opening closed along the seam allowance.

I stitched the pants leg together from the hem up to the waist, following the curve of the pocket.

I clipped the corners at the pockets and finished the raw edges. I removed the basting and “bingo!” I’ve got pockets!

Book Review: Vogue Easy Sewing

I love summer. Finally, our mornings are free to do the weekly library thing again! Yeah! Anyway, I’ve been checking out a few books also. I hope (for the sake of my sewing students and friends) to review some of them here. Here’s the first:

Vogue Easy Sewing by Lynn Ferrari and the Butterick Company, Inc.
Published 1985
ISBN: 0-06-181128-9

Some Chapter Headings:

  • Easy Wardrobe Planning
  • Fabric Dos and Don’ts
  • How to Press
  • How to Sew by Hand

I liked:

  • A great detailed “Needle and Thread Chart” on Page 31.
  • The chapter labeled “How to Press”, which had good guidelines, but even better pictures and diagrams! This section included fool-proof instructions for pressing darts, gathers, pleats, sleeves, hems, and seams. Probably the best pressing instructions I’ve seen.
  • The chapter labeled “How to Sew By Hand”, which included only a few stitches (back stitch tacks, slip stitch, blind stitch and thread chain), all essential to any sewer.
  • The last section “Easy Sewing Techniques” that is broken down into chapters based on the techniques that “scare” some sewers, including bands, buttonholes, darts, pockets, sleeves and zippers.

My dislikes:

  • There is no information on invisible zippers or collars with a stand.

Conclusion: This is a great reference for any sewer that has progressed past pillows and PJ pants and is now ready to tackle garments. The book is really easy to follow and has great illustrations for the techniques. I’ll tell you again–I love the pressing chapter! One small warning–you’ll have to look past the mid-1980s photos in the middle of the book. Gotta love shoulder pads!

Would I buy it for myself? Absolutely. I’ve already looked it up on Amazon.

Would I buy it for a beginner sewer? Maybe.

I’m finished!!!!!!!


I am so excited!!!!! I am completely finished with my 2008 Wardrobe Contest Entry. I have finished all my reviews and you can find them on Pattern Review. Here are the stats:

11 pieces:

  • 4 tops
  • 1 jacket
  • 4 bottoms
  • 1 dress
  • 1 purse

22 total outfits (that I’d actually wear in public)

Fabric used: 26 yards

  • 26 yards out of stash
  • 0 yards bought

Patterns used: 9

  • 3 TNT
  • 4 never used from my stash
  • 2 brand new (I love 99 cent sales!)

Total spent: $14.40

Not bad for 22 new outfits!!!!

Tonsils, Purses, Wardrobes, and My Sunshine

My we’ve had a lot going on. The Big Girl has had quite a time. 2 weeks ago she had her Kindergarten program. (I’m trying to post a short video. I’ll try again later tonight.)

She spent last week recovering from strep throat (again!) and this week is recovering from a tonsilectomy!

As for sewing: Yes, I am still working on my PR Wardrobe Contest. I have just one piece to go!!!! Of course, it would be the brand new pattern that I’ve never tried and that I want to modify into something else. I need to just bite the bullet and do it!!! Here are a few piecesI’ve finished lately:

Simplicity 4020 (how do I love this pattern!) Actually, I’m a little disappointed with this top, but I won’t tell you why. Then maybe you won’t notice. 😉


This top is New Look 6648. I love it!!! The skirt is from Simplicity 4036 (modified alot!)


I whipped up this purse for a sweet little friend’s 6th birthday. I love the pattern because it is super simple and therefore, perfect to play with! It’s Simplicity 4178. I’ve made it up in a cute school-girl plaid. After I finishing embellishing it, I’ll post pictures and the review on PR.

And in closing:

Guarding the Pork Chops

(Check out the shoes!)